My 34th Recipe is "Kadalai Paruppu Kuzhambu", the third south Indian gravy I am posting using brinjal. You have guessed it wrong 😀 By no means, brinjal is my favorite vegetable. In fact, I do not like the texture of cooked brinjal. Since brinjal is abundantly available in the supermarkets here compared to other veggies; I have adapted myself to eat brinjals by incorporating it in multiple tasty dishes. This gravy is very easy to make and goes very well with rice, idly or dosa. A match made in heaven 😉 And with the added Kadalai Paruppu it is extremely healthy too.

Kadalai Paruppu Kuzhambu
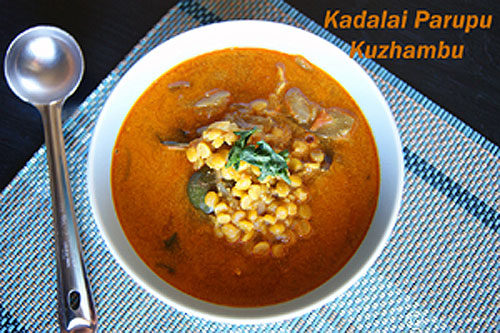
Kadalai Paruppu Kuzhambu
Kadalai Paruppu Kuzhambu is a flavorful South Indian gravy made with kadalai paruppu (dal) and veggies. Perfect to have along with a hot white rice.
Ingredients
- ½ Cup Kadalai Paruppu | Channa Dal
- ¼ tsp Turmeric Powder
- ¼ tsp Asafoetida
- ½ Onion (Sliced)
- 4 small Brinjal
- ½ Tomato (Chopped)
- 4 cloves Garlic (Crushed)
- 1 Tbsp Sambar Powder
- 1 tsp Salt (Adjust as per taste)
- 3 Cups Water
- 1 Tbsp Coriander leaves (Finely chopped for garnishing)
To Temper
- 1 Tbsp Oil
- 2 Cardamom
- 3 Cloves
- 1 Cinnamon Stick
- 5 Curry leaves
To Grind
- ¼ Cup Coconut (Chopped)
- ½ Tbsp Fennel Seeds
Instructions
- Cook the Channa Dal with a pinch of turmeric and asafoetida, in a pressure cooker for 2 whistles. It need not be cooked fully, it should be 80-90% done.
<br><br><img src="//revi.b-cdn.net/wp-content/uploads/2017/02/kpdal1.jpg" alt="kadalai" width="48%"> <img src="//revi.b-cdn.net/wp-content/uploads/2017/02/kpdal2.jpg" alt="kadalai" width="48%"> - Grind the coconut and fennel seeds together with water and make a paste.
<br><br><img src="//revi.b-cdn.net/wp-content/uploads/2017/02/kpcoconut1.jpg" alt="kadalai" width="48%"> <img src="//revi.b-cdn.net/wp-content/uploads/2017/02/kpcoconut2.jpg" alt="kadalai" width="48%"> - Heat a pan of Oil. Once hot; temper with Cardamom, Cinnamon Stick, Cloves and Curry Leaves. Now, add the sliced onions, garlic and sauté till onion turns brown.
<br><br><img src="//revi.b-cdn.net/wp-content/uploads/2017/02/kponion1.jpg" alt="kadalai" width="48%"> <img src="//revi.b-cdn.net/wp-content/uploads/2017/02/kponion2.jpg" alt="kadalai" width="48%"> - Add the chopped tomatoes and sauté for 30 secs. Then, add the brinjals and sauté for another 30 secs.
<br><br><img src="//revi.b-cdn.net/wp-content/uploads/2017/02/kptomato.jpg" alt="kadalai" width="48%"> <img src="//revi.b-cdn.net/wp-content/uploads/2017/02/kpbrinjal.jpg" alt="kadalai" width="48%"> - Now, add the sambar powder, turmeric powder, asafoetida and salt. Add 3 Cups of water and let it boil.
<br><br><img src="//revi.b-cdn.net/wp-content/uploads/2017/02/kpmasala.jpg" alt="kadalai" width="48%"> <img src="//revi.b-cdn.net/wp-content/uploads/2017/02/kpwater.jpg" alt="kadalai" width="48%"> - Wait until the brinjal is 90% cooked and the raw smell of the masala is gone. Now, add the cooked dal and leave it to cook until both the brinjal and dal is fully cooked.
<br><br><img src="//revi.b-cdn.net/wp-content/uploads/2017/02/kpgravy1.jpg" alt="kadalai" width="48%"> <img src="//revi.b-cdn.net/wp-content/uploads/2017/02/kpgravy2.jpg" alt="kadalai" width="48%"> - Finally, add the coconut fennel paste and turn down the heat to low. Let the Kuzhambu cook for another 3 mins. Turn off the flame and garnish with coriander leaves.
<br><br><img src="//revi.b-cdn.net/wp-content/uploads/2017/02/kpgravy3.jpg" alt="kadalai" width="48%"> <img src="//revi.b-cdn.net/wp-content/uploads/2017/02/kpgravy4.jpg" alt="kadalai" width="48%"> - Enjoy the Kuzhambu hot.<br><img src="//revi.b-cdn.net/wp-content/uploads/2017/02/kadalai-paruppu-kuzhambu-1.jpg" alt="kadalai paruppu kuzhambu" width="100%"> <img src="//revi.b-cdn.net/wp-content/uploads/2017/02/DSC08344.jpg" alt="kadalai paruppu kuzhambu" width="100%">
Notes | FAQ
- While adding salt and sambar powder, adjust based on your taste buds.
- Adding drumstick along with brinjal will improve the flavor of the kuzhambu drastically. I did not add, since I get it only very rarely here 🙁
Tried this recipe?Let us know how it was!
Manju says
I read the recipe of chanadal and brindle. I do make bottlegourd and China dal Gujarati style but going to try your south Indian method with the same ingredients.
I am very excited to try this tomorrow.
lata says
Revathi , your photos and recipes are amazing ! You've organized everything in such a beautiful way . I can't believe that there are no comments here. Anyway , awesome blog .
revifood says
Thanks Lata, you are very sweet.